From Raw To Wow: Trimming Out the Noise for Sharper Storytelling

You know that feeling when a video drags, people glance away, and the message disappears into a sea of filler? That’s the exact problem a reliable video cutter solves. Start with long, messy footage and you can sculpt it into something that breathes, moves, and tells a clear story.
Pippit is the tool I reach for when I want to turn raw footage into tight, scroll-stopping narratives — whether that’s a quick product demo, a founder story, or a micro-documentary.
Let’s talk about how to cut with intention so every second earns its place.
Why Less Truly Is More For Narrative Clarity?
Trimmed video feels confident. Untrimmed video feels apologetic. When you remove the pauses, the repeated lines, the camera fidgets, and the filler words, you force the core idea forward. The audience doesn’t have to work to find the point; the point walks up and taps them on the shoulder.
A tighter edit does several things at once:
- Improves pacing so viewers stay engaged.
- Highlights the emotional beats so the story lands.
- Increases shareability because shorter content is easier to finish and rewatch.
If storytelling is a conversation, trimming is the social grace that keeps people listening.
The Art Of Ruthless Selection
Trimming starts with ruthless listening and watching. Don’t be gentle — be discerning. Watch your footage once for pleasure, then again with a red pen in hand. Ask three questions for every second of video:
- Does this move the story forward?
- Does this reveal character or emotion?
- Does this feel necessary for context?
If the answer isn’t yes to at least one of those, it’s a candidate for the cut list. This is where a video cutter becomes your scalpel, letting you remove the non-essential and preserve the heart.
Build Rhythm, Not Just Sequence
Cutting is musical. A well-edited piece has a pulse, a pause, and a beat. Think of scenes like phrases in a song. Short clips create staccato energy; longer shots let viewers breathe. Playing with cut lengths gives you dynamic range — small moments for intimacy, bigger beats for impact.
Try this: map the emotional arc, then assign average shot lengths to each beat. Fast cuts for the reveal, medium cuts for explanation, a long hold for emotional payoff. That structure helps you keep viewers on a journey rather than wandering.
Preserve Authenticity While Trimming
One fear creators have is that trimming will sterilize authenticity. The trick is to trim away the noise, not the personality. Keep the small imperfections that reveal humanity — a laugh, a hesitation that signals thought, a glance that says more than words. Those are the things that make viewers relate.
A helpful rule: if a raw moment makes you smile, keep it. If it distracts you from the message, lose it.
Transitions That Feel Like Extensions Of The Story
Transitions should feel intentional. Hard cuts can be punchy and modern, while dissolves whisper continuity and memory. Match your transition style to the story’s tone. For product specs, a crisp hard cut usually wins. For reflective or nostalgic content, soft dissolves and frame blends create space.
Also consider sound bridges. Even a faint underscoring across a cut smooths the edit and ties two shots emotionally.
When To Use Reverse And When Not To
Reverse is a playful tool. A spilt drink reassembling itself, a dropped object soaring back to hand, or a reveal that un-happens before snapping into the actual reveal are just a few examples of how Pippit’s video reverser may be used judiciously to accentuate a moment or provide a scratch-of-magic effect. Reversal creates curiosity and rewatch value, but overuse turns novelty into a gimmick.
Think of reverse clips as visual exclamation points. Place them at moments you want viewers to pause, rewatch, or laugh.
Snip And Ship: Easily Cutting A Video Utilizing Pippit’s Video Cutter
Step 1: Begin With Pippit’s Video Editor

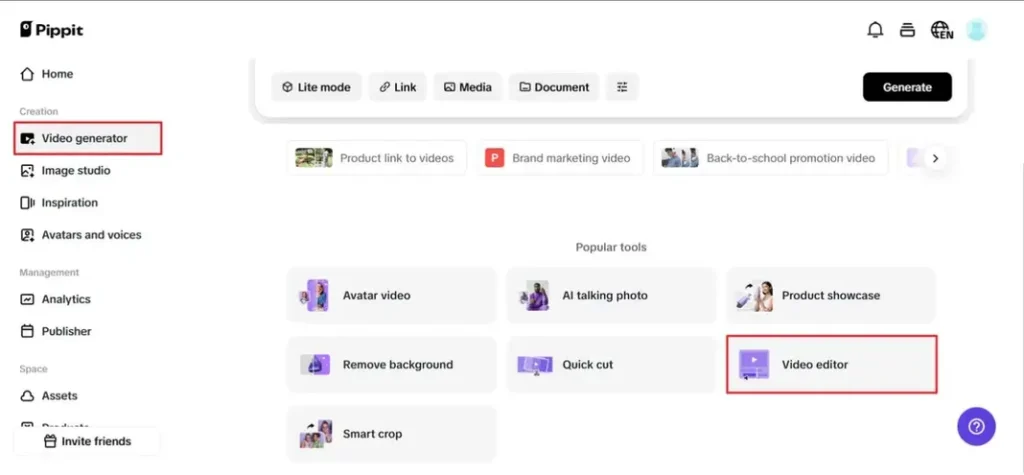
Sign up to Pippit, go to the dashboard, select the video generator from the left-hand menu, and open the video editor. Import your footage by clicking to upload or dragging it directly onto the canvas. Your timeline loads immediately, so you can begin crafting the narrative.
Step 2: Utilize The Video Cutter

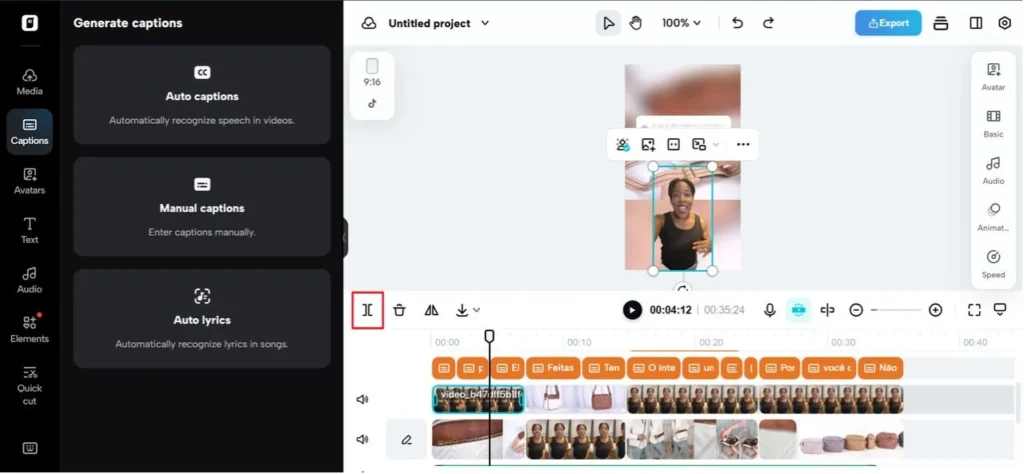
Drag the boundaries of the clip you’ve selected on the timeline to shorten it from the front or back. A segment in the middle can be eliminated by parking the playhead where the fluff starts, splitting, moving to the end of the fluff, splitting once more, and then deleting the middle piece. All that’s left is a crisp, seamless sequence that feels quick and deliberate.
Step 3: Download OR Share The Trimmed Video

When the flow is feeling good, hit export. Select download to manually set resolution, format, frame rate, and quality, then save it out. Or select publish to immediately send your cut to your social accounts with settings already optimized for the platform.
Storytelling With Stills: Image To Video Synergy
Not every story needs motion captured live. Sometimes a powerful sequence of photos, animated subtly, tells a story faster and cleaner than raw footage. That’s where image to video techniques shine: gentle parallax, quick zooms, and timed crossfades create movement without a full reshoot. Use stills to condense time, show progression, or emphasize details that would be tedious in a long take.
When you combine trimmed clips with animated stills, your pacing becomes flexible. You can expand a moment into a slow reveal or compress a timeline into a three-second montage.
Voice And Captions As Edit Tools
Remember, cuts aren’t just visual. Trim your audio tight. Remove filler words and tighten pauses so the speaker sounds crisp and confident. For platforms where sound is off by default, captions timed to the revised edit are essential. Make captions breathe with the cuts; let lines appear and disappear on beats so silent viewers follow the rhythm.
Practical Trimming Techniques That Feel Like Magic
- Cut on movement: match action across cuts to reduce visual friction
- Shorten pauses: remove gaps while keeping natural breaths intact
- Keep reaction shots: a short reaction after a line sells the emotion more than extended footage
- Remove redundancy: if the same point is made twice, choose the clearest delivery
- Use jump cuts cleverly: jump cuts can speed up monologues while keeping authenticity
A few smart trims make the narrative clearer without losing the human texture.
Final Frame: Make Every Second Earn Its Keep
Sharp storytelling is less about fancy tricks and more about generosity — giving your audience only what they need to connect. Use your video cutter to remove the noise, the meandering tangent, and the excessive setup. Keep the details that humanize. Use image-to-video moments to condense time or highlight beauty. And occasionally, deploy a video reverser for playful punctuation that makes people rewind.
Pippit helps you do all of this in one workflow, from trimming and precise cuts to mixing stills and playful reverse moments. Ready to turn raw footage into work that sings? Open Pippit, trim with intention, and let every frame pull its weight.
Trim with intention, keep the heart, and let your story breathe. Ready to cut? Try Pippit and watch raw footage become a sharper, more persuasive story.
Also Know About: ICAL Capcut Templates
